该文章仅供学习使用,请勿用于违法行为
方案一
1.更新系统
apk update && apk upgrade2.查看ip
curl ifconfig.me3.alpine中安装hysteria2
wget -O hy2.sh https://raw.githubusercontent.com/zrlhk/alpine-hysteria2/main/hy2.sh && sh hy2.sh如果没有成功,可以重复执行,会覆盖密码
打开 V2,选择服务器,选择添加 hy2 服务器
别名:随便
地址:2a01:4f9:6b:47e9::345             ipv6
端口:40443                            去配置文件:/etc/hysteria/config.yaml  查看
密码:5PK35VON4/KM64bxw8cEXtkt         去配置文件:/etc/hysteria/config.yaml  查看
混淆密码:空
跳跃端口范围   空

传输层安全  tls
SNI    bing.com
跳过证书验证   true      其他默认
在Alpine系统上完全卸载Hysteria2
1. 停止运行中的hy2服务
sudo rc-service hysteria stop2. 禁用开机自启动
sudo rc-update del hysteria3. 删除hy2服务文件
sudo rm /etc/init.d/hysteria4. 删除hy2配置文件
sudo rm -rf /etc/hysteria/5. 确认卸载完成
ps aux | grep hysteria如果仅显示 grep hysteria,则表明系统中已无 Hysteria2 进程,卸载成功。
4.hysteria进程保活
1.新建脚本
/usr/local/bin/hysteria-keepalive.sh:
内容:
sudo tee /usr/local/bin/hysteria-keepalive.sh > /dev/null << 'EOF'
#!/bin/sh
#
# 只要 hysteria 服务退出,就自动重启并记录日志
#

# 配置 hysteria 可执行文件路径(根据实际安装位置改)
HY_EXEC="/usr/local/bin/hysteria"
# 配置 hysteria 的 YAML 文件路径(根据实际位置改)
HY_CONF="/etc/hysteria/config.yaml"
# 日志文件路径,放在家目录更安全,避免权限问题
HY_LOG="$HOME/hysteria-restart.log"

# 无限循环
while true; do
  # 启动 hysteria 服务端
  $HY_EXEC server -c "$HY_CONF"
  # 将退出码和时间写进日志
  echo "[hysteria] 进程已退出 (退出码 $? ),$(date) 重新启动" >> "$HY_LOG"
  # 等待 1 秒 再重启
  sleep 1
done
EOF

# 赋可执行权限
sudo chmod +x /usr/local/bin/hysteria-keepalive.sh
2.手动验证脚本没语法错误且能单独跑通:
sh /usr/local/bin/hysteria-keepalive.sh
3.用 nohup 把脚本丢到后台跑
nohup /usr/local/bin/hysteria-keepalive.sh > ~/hysteria-nohup.log 2>&1 &4.验证后台进程是否正常运行
ps aux | grep “hysteria-keepalive.sh”应该能看到 … hysteria-keepalive.sh 这一行,说明脚本还在跑。
查看 Hysteria 服务端子进程
ps aux | grep “[h]ysteria server”如果看到类似 /usr/local/bin/hysteria server -c /etc/hysteria/config.yaml 的行,就说明它在跑。
查看日志文件:看重启记录
tail -n 20 ~/hysteria-restart.log如果脚本刚启动不久,你可能暂时看不到日志(还没挂掉过);等你手动杀掉子进程再重启时,就会在这里看到新的一行 [hysteria] 进程已退出 (退出码…),日期 重新启动。
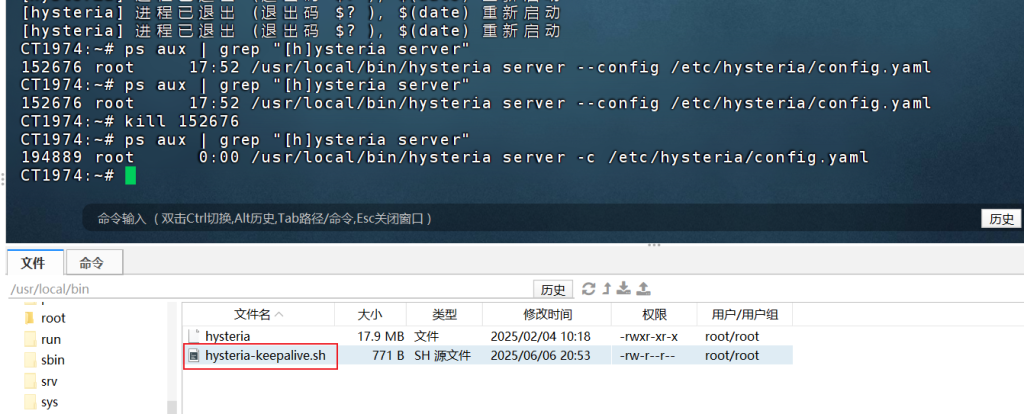
5.触发一次“手动杀进程”,测试保活效果
查看 Hysteria 服务端子进程:
输入 ps aux | grep “hysteria server” 记住子进程的 PID
152676 root 17:52 /usr/local/bin/hysteria server –config /etc/hysteria/config.yaml
kill 152676
等 1~2 秒钟。再次:ps aux | grep “[h]ysteria server”
如果你看到一个新 PID,比如现在是 23480,就说明脚本侦测到 “原来 152676 挂了”,然后 1 秒后重新启动成 23480,完美保活。
方案二
前置条件 / Prerequisites ⚙️
系统 / System: Alpine Linux(建议 3.18 或更高版本)或任何 BusyBox 系统。
内存 / Memory: 最低 128MB(Hysteria 2 运行仅需 ~20MB,64MB 内存不足以稳定运行)。
权限 / Permissions: 需要 root 权限。
架构 / Architecture: 默认 x86_64(arm64/armv7 需修改二进制 URL)。
网络 / Network: 需要公网 IP 或 NAT,UDP 端口已开放。
依赖 / Dependencies:
bash、curl、wget、openssl(自动安装)。NAT VPS 注意 / NAT VPS Note: 确保 UDP 端口已由 VPS 提供商映射到公网!🌍
安装 / Installation 🚀
一键安装 / One-Click Install
curl -o hysteria.sh -fsSL https://raw.githubusercontent.com/MEILOI/HYTWOALPINE/main/hysteria.sh && chmod +x hysteria.sh && ./hysteria.sh手动安装 / Manual Install
curl -o hysteria.sh -fsSL https://raw.githubusercontent.com/MEILOI/HYTWOALPINE/main/hysteria.sh
chmod +x hysteria.sh
./hysteria.sh
依赖安装(若失败) / Dependency Install (If Failed)
如果脚本提示依赖安装失败,运行以下命令:
If the script reports dependency installation failure, run:
echo 'https://dl-cdn.alpinelinux.org/alpine/v3.21/main' > /etc/apk/repositories
echo 'https://dl-cdn.alpinelinux.org/alpine/v3.21/community' >> /etc/apk/repositories
apk update
apk add --no-cache bash curl wget openssl
替换 v3.21 为你的 Alpine 版本(查看:cat /etc/alpine-release)。
更换镜像源 / Change Mirror Source
如果默认镜像源(dl-cdn.alpinelinux.org)不可用,尝试以下镜像:
sed -i 's/dl-cdn.alpinelinux.org/mirrors.tuna.tsinghua.edu.cn/g' /etc/apk/repositories
apk update
apk add --no-cache bash curl wget openssl
其他可选镜像源 / Other mirror options:
mirrors.aliyun.commirrors.ustc.edu.cn
运行以下命令切换:
sed -i 's/dl-cdn.alpinelinux.org/mirrors.aliyun.com/g' /etc/apk/repositories
apk update
apk add --no-cache bash curl wget openssl
防火墙(NAT VPS) / Firewall (NAT VPS) 🔒
NAT VPS 用户需在 VPS 控制面板或主机防火墙手动放行 UDP 端口(例如 55555)。
示例(使用
nftables) / Example (usingnftables):nft add rule ip filter input udp dport 55555 accept或使用
iptables(若主机支持) / Or useiptables(if supported):iptables -I INPUT -p udp --dport 55555 -j ACCEPT
使用方法 / Usage Guide 🎮
运行
./hysteria.sh,选择选项1安装。配置 / Configure:
证书 / Certificate: 选择必应自签名(默认)、ACME 自动证书或自定义证书路径。📜
端口 / Port: 输入 UDP 端口(1-65535)或回车随机分配。
密码 / Password: 设置密码或回车生成随机密码。
伪装网站 / Masquerade Site: 输入网站(如
www.bing.com)或回车使用默认。端口跳跃 / Port Hopping: 默认启用,配置
hopInterval(如 30s)以动态切换端口!🔄
脚本生成 / Script Output:
客户端配置文件 / Client Config:
/root/hy/hy-client.yaml分享链接 / Share Link:
/root/hy/url.txt
导入客户端 / Import to Client:
自签名证书需启用
insecure: true。ACME 或自定义证书需确保域名正确解析。
使用菜单(选项 3-6)管理服务:启动 / 停止、修改配置、更新内核。
NAT VPS 注意 / NAT VPS Note: 确保端口已映射到公网,否则客户端无法连接!🌐
端口跳跃提示 / Port Hopping Tip: 检查
hy-client.yaml中的transport.udp.hopInterval,调整间隔(30s-60s)以优化性能!
安装后操作 / Post-Installation Steps 🛠️
验证服务 / Verify Service:
ps | grep hysteria
cat /var/log/hysteria.log
netstat -tunlp | grep <port>
添加开机启动 / Add Auto-Start:
crontab -e
@reboot nohup /usr/local/bin/hysteria server --config /etc/hysteria/config.yaml > /var/log/hysteria.log 2>&1 &
故障排除 / Troubleshoot:
查看
/var/log/hysteria.log检查错误。确保 UDP 端口已放行(NAT VPS 用户联系提供商)。
验证依赖:
command -v bash curl wget openssl。
故障排除 / Troubleshooting 🐞
依赖安装失败 / Dependency Installation Failure:
问题 / Issue:
apk提示no such package或网络超时。解决 / Solution:
确保网络正常,检查
/etc/apk/repositories是否包含main和community仓库:cat /etc/apk/repositories手动配置仓库:
echo 'https://dl-cdn.alpinelinux.org/alpine/v3.21/main' > /etc/apk/repositories
echo 'https://dl-cdn.alpinelinux.org/alpine/v3.21/community' >> /etc/apk/repositories
apk update
apk add --no-cache bash curl wget openssl
如果仍失败,切换镜像源:
sed -i 's/dl-cdn.alpinelinux.org/mirrors.tuna.tsinghua.edu.cn/g' /etc/apk/repositories
apk update
apk add --no-cache bash curl wget openssl
其他镜像源选项:
mirrors.aliyun.com,mirrors.ustc.edu.cn。
验证 / Verify:
command -v bash curl wget openssl
内存不足 / Insufficient Memory:
问题 / Issue: 64MB 内存设备运行失败或崩溃。
解决 / Solution:
本脚本最低要求 128MB 内存,Hysteria 2 运行占用 ~20MB。64MB 内存不足以稳定运行,可能导致进程终止。
建议升级到 128MB 或更高内存的 VPS。
检查内存使用:
free -m释放内存(若可能):
sync; echo 3 > /proc/sys/vm/drop_caches
网络问题 / Network Issues:
问题 / Issue: 无法下载 Hysteria 二进制或获取 IP。
解决 / Solution:
检查网络连通性:
ping dl-cdn.alpinelinux.org
curl -I https://github.com
使用备用 DNS:
echo "nameserver 8.8.8.8" > /etc/resolv.conf尝试其他网络源:
wget -O /usr/local/bin/hysteria https://github.com/apernet/hysteria/releases/latest/download/hysteria-linux-amd64
端口未放行 / Port Not Opened:
问题 / Issue: 客户端无法连接。
解决 / Solution:
NAT VPS 用户需在控制面板或主机防火墙放行 UDP 端口:
nft add rule ip filter input udp dport 55555 accept或使用
iptables(若支持):iptables -I INPUT -p udp --dport 55555 -j ACCEPT联系 VPS 提供商确保端口映射到公网。
验证端口开放:
netstat -tunlp | grep 55555
ACME 证书申请失败 / ACME Certificate Failure:
问题 / Issue: 域名未解析或网络问题。
解决 / Solution:
确保域名已解析到服务器 IP:
ping <your-domain>检查 80 端口是否开放(ACME 需要):
netstat -tunlp | grep :80重新运行 ACME:
~/.acme.sh/acme.sh --issue -d "<your-domain>" --standalone
端口跳跃问题 / Port Hopping Issues:
问题 / Issue: 端口切换不稳定或客户端断连。
解决 / Solution:
检查
hy-client.yaml中的hopInterval,建议 30s-60s:cat /root/hy/hy-client.yaml | grep hopInterval调整间隔(例如 60s):
sed -i 's/hopInterval: 30s/hopInterval: 60s/' /root/hy/hy-client.yaml重启服务:
kill $(cat /run/hysteria.pid); nohup /usr/local/bin/hysteria server --config /etc/hysteria/config.yaml > /var/log/hysteria.log 2>&1 &
补充:设置端口跳跃
apk add iptables ip6tables
iptables -t nat -A PREROUTING -p udp --dport 20000:40000 -j REDIRECT --to-port 9443
ip6tables -t nat -A PREROUTING -p udp --dport 20000:40000 -j REDIRECT --to-port 9443
iptables-save > /etc/iptables/rules.v4
ip6tables-save > /etc/iptables/rules.v6
rc-update add iptables
rc-update add ip6tables
rc-service iptables save
rc-service ip6tables save